When I started making bows, I had to order finished bow laminations and overlays from a bow making supplier because I didn’t have a thickness sander. Even though buying prepared laminations was faster and easier, the problem was that I had to order everything I needed one or two weeks before starting the bow. Also, if I didn’t order enough lams or the right ones, or…smack me with an arrow shaft…I broke a lamination, then I wouldn’t have enough lams or overlays to complete the bow and production would come to a screeching stop. Plus, I had to order my lams in standard sizes, which wasn’t always ideal when trying to hit the perfect draw weight on a bow without having to sand the glass or narrow the limbs.
It didn’t take long for me to realize that I needed my own lamination grinder. I didn’t want to spend a lot of money on the project, either…so I went to the computer and spent several hours searching for “thickness sander” instructions on the internet. I found several articles, but none that were exactly what a bowyer needs. So, I combined a couple of build alongs in order to come up with this variation of the project. How did it turn out? It turned out great and it works really well for making bows! In fact, it works so well for veneers and small parts that I prefer to use this little sander for making overlays, power lams, tip wedges, and some super thin veneers instead of using the large dual drum sander that I bought later.
If you are looking for an inexpensive thickness sander for grinding laminations and overlays, this might be a good option. The following directions and photos show how you can make this simple lam grinder yourself with mostly parts and materials that you can get at your local hardware or home improvement store.
Here’s a list of the parts you’ll need:
- 1/4 hp-to-1/3 hp electrical motor, 1/2” shaft, 1725 rpm, with mounting base
- 3” x 3” drum sander unit with collar or sleeve adapter to fit 1/2” motor shaft
- 50-grit sanding sleeves to fit the drum sander
- electrical outlet box and switch cover
- 115v/15amp light switch
- wire nuts
- heavy duty 15 amp-3 wire extension cord
- 2 @ 3/4” x 13-1/4” x 15” MDF base boards
- 2 @ 3/4” x 6-1/2” x 8-1/4” MDF motor base boards
- 4 @ 3/4” x 4” x 4” MDF “feet” below base
- 2 @ 1/2” x 5” x 7-1/2” MDF dust tower sides
- 1 @ 1/2” x 5” x 5” MDF dust tower top (with hole for dust collection)
- 2 @ 3/4” x 4” x 16” MDF ramp table (can substitute formica sink cut-out material for top board)
- 3/4” x 4” x 38” MDF boards for various lamination sleds
- 1 pkg 150 grit sand paper
- 1 roll two-sided carpet tape
- 2 @ 1/16” x 5” x 4-3/4” plexiglas for dust tower front and back
- small screws or brads for dust cover boards and plexiglass mounting
- small hinges for sled ramp
- small screws for hinges
- 1/4” x 2-1/2” bolt, nuts for ramp table adjuster
- plastic handle for ramp table adjuster bolt
- machine bolts, washers, nuts for motor mount
- wood glue
- 3”-to-2” reducer to 2” dust collection or reducer to shop vac hose, etc.
Motor
I started out by finding a suitable motor and a sanding drum to fit the motor shaft. You can use about any old motor laying around the shop or buy a new one. I did an online search and bought a 1/4 hp motor from Amazon. It is an A. O. Smith model GF2024. It has 1/2” x 1-1/2” of exposed shaft and runs at 1,725 rpm. The rotation can be changed for clockwise or counter-clockwise rotation. I like to feed the lamination grinding sleds into the sander from the right side, so I set my motor to spin the drum counter-clockwise (when looking at the end of the drum), so that the sander is pushing against the direction of feed. The 1/4 hp motor is quite adequate in power and does not slow down or overheat during continued use.
I bought mine from Amazon for about $74 with free shipping. Click here to get this motor at Amazon. If this link gets broken or outdated, just do an internet search for the A. O. Smith model GF2024 motor and you should be able to find one online. Another idea is to look around at your local hardware and home improvement stores to see if they have a suitable motor. Your local electrical parts supplier might have a good motor, but they might also be really expensive. This A. O. Smith model GF2024 is a “blower” motor, so you might be able to find one at a local heating and air conditioning supplier as well. I have seen little motors like this at garage sales and auctions sell really cheap, so it is a good idea to watch for them when you are out and about at sales. Just be aware of the shaft size of the motor you buy. Most of them come with a 1/2” or 5/8” shaft. It is important to get a motor with a shaft size that will fit your drum sander unit or it will have to be converted with an adaptor. Also, make sure that the motor polarity can be adjusted in order for the sander drum to spin in the correct direction depending on the direction you want to feed the laminations through the finished sander unit. If you buy a new motor, it should include an instructions sheet for changing the polarity. This A. O. Smith motor says on the label, “For CW ROT interchange RED & BLK” …which means to pull off the cover plate where the power cable goes into the motor and exchange the position of the red and black wires inside the motor.
Drum sander
I found a 3” (diameter) x 3” (long) drum sander with an adapter sleeve attached to the drum that allows the sander unit to fit right onto the 1/2” motor shaft. Mine is a “Clesco 1/2” bore sanding drum with shaft adapter” (www.climaxmetal.com part number SD048048-08MD4 or www.clesco.com part number MD 4848-4). The nice thing about this model is that it slides right onto the motor shaft without having to use an adapter sleeve. If your drum sander unit comes with a shaft instead of a sleeve, it will need a sleeve adapter it fit onto the motor shaft.
This drum sander unit accepts 3” x 3” sanding sleeves that slip over the end of the rubber drum. There is a right-handed threaded bolt that tightens on the end of the drum unit to expand the rubber drum and hold the sanding sleeve into position. When tightened, the ends of the rubber drum tend to expand more than the center, so you will want to insert some type of plug into the center of the sanding drum. I used a piece of PVC pipe with some duct tape wrapped around the center of the pipe. I wrapped enough tape around the center so it had to be forced into the rubber drum and made the sanding drum expand in the middle. I experimented with wrapping just the right amount of tape so that the outside of the drum becomes perfectly straight after it is tightened up. Clesco supposedly makes a solid rubber insert for their drum, but I have not been able to find one to purchase.
Click here to get this sanding drum at Climax Metal Products Company.
Click here to get this sanding drum at Woodworker’s Supply. (Thank you Thad Blackwell!)
Click here to get a 3″ x 3″ x 1/2″ shaft sanding drum at Woodcraft. This one has a 1/2″ shaft and will require a conversion sleeve to fit on a 1/2″ motor shaft. This drum uses sheets of ordinary sand paper, which means you can use zirconium abrasives on it. Zirconium cuts faster and won’t plug up as fast as ordinary aluminum oxide sand paper!
If these links get broken or outdated, just do an online search for the Clesco part number or description and you should find a current supplier.
Update: Here are links to a 1/2″ shaft coupler or sleeve adapter:
Click here to get a 1/2″ keyed shaft coupler from The Big Bearing Store.
Click here to get a 1/2″ keyed shaft coupler from Roller Chain 4 Less.
Ramp table
For the ramp table, I cut out a couple of 3/4” x 4” x 16” boards—the bottom one out of MDF and the top one out of a formica counter top cut out that I scavenged from a local kitchen cabinet making shop. You can use MDF or plywood for both boards, but the formica surface on the top board lets the lam sleds slide really nicely through the sander. You could use aluminum, actionwood, or Dymondwood if you want a more weather-resistant ramp table that won’t absorb moisture or tend to warp as much over time. The bottom ramp table board is attached to the MDF base boards. The two ramp table boards are connected together on one end with one or two little cabinet hinges. The ramp table adjusting bolt is installed in the other end of the bottom board. Just drill the hole so the bolt fits tightly through the board, or drill and tap the board so the bolt will thread through the bottom board. Attach the plastic handle to the bolt and the ramp adjuster assembly is ready for use.
Base table
The base boards and motor mounting boards are all stacked up and glued and screwed together and drilled for the motor bolts. Then the motor is mounted to the bases. I glued additional square blocks to the bottom corners of the base board to provide clearance for the adjustment screw.
Wiring
The wiring was pretty straightforward and easy. I used 16-3 black rubber power tool replacement extension cord. In order to make the wiring to the motor easy to attach, I crimped solderless terminals to the ends of the power cord wires. Make sure to ground the wire to the motor housing, and also to reverse the rotation of the motor if necessary. I ran the wiring through a standard metal, utility box, with a 15 amp motor switch, then ran the wiring out to a grounded plug. I got all of the electrical supplies at my local Home Depot store.
Cost
The total cost of the sander was about $160, and about half of that cost was for the motor. The motor was about $74 shipped.
Dust collection
I installed the dust collection hood and an adaptor to fit my dust collection system, but a shop-vac would work just fine with the appropriate adapter. I really recommend using this dust collection hood! This little grinder really puts out a lot of dust and debris…and to make matters worse…you’ll probably have your face and nose right down on top of it while grinding lams.
Sleds
I use several 3/4” x 4” x 38” MDF boards for my lamination sleds—one for each taper (parallel, .001 taper per inch (tpi), .002” tpi, etc.).
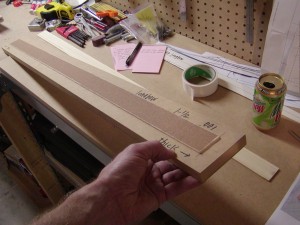
To make the sleds, I cut strips of 150 grit sand paper and taped them down to the top of the MDF board with two-sided carpet tape. I also put a thin stop block at the end of the sled to help keep the sander from shooting the lamination out the end. For a parallel lamination sled, just tape the sandpaper right onto the MDF board. For a tapered lamination, first tape down a tapered lamination, then put the sandpaper on top of it. Orient the pattern so the thin end of the sled/pattern/lamination stack goes into the grinder first. To grind a matching tapered lamination, just put a parallel lamination on the sled and it will come out with the same taper as the one taped down to the sled. You’ll figure this out really fast.
Look closely at the photos and you can see that I made the table two boards thick…the top board being a spacer. With the spacer inserted, I can feed a short parallel lamination through the sander without a sled. This is really convenient for quickly grinding short lams for riser back overlays and tip overlays! With the spacer removed, there is just the right space for the sleds to feed through.
I use 50-grit sanding drums for almost all laminations, but sometimes use 80-grit for super thin veneers to help keep from tearing the wood.
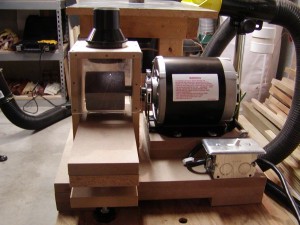
This photo shows a view of the right side.
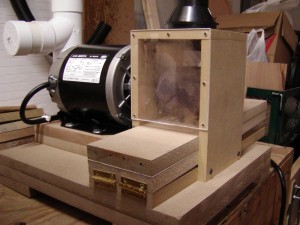
This photo shows a view of the left side.
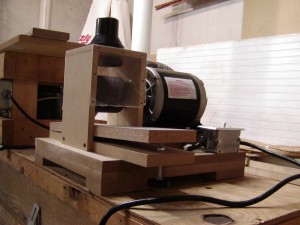
This photo shows a 3/4 view of the right side.
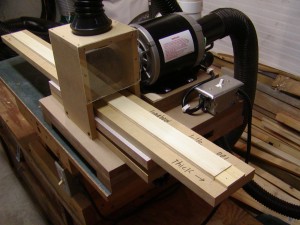
This photo shows running a lamination sled through the grinder from right-to-left.
This is a typical lamination sled with sand paper to hold the lamination blank. There is two-sided carpet tape under the top strip of sandpaper. There is also carpet tape under the lamination holding it to the sled. The sled is a piece of MDF board.
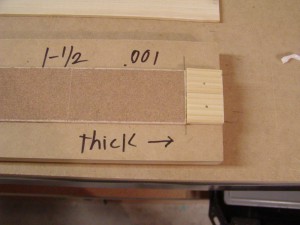
The right side of a typical sled. This photo shows the stop block. “Thick arrow” means to me that this is the thick side of the sled/stack. This is one of my first sleds. Now I just put an arrow showing the direction of travel or don’t write anything on them at all…lol.
Please share this with your friends, and feel free to leave a comment.




Woodworker's Supply has a drum sander designed to mount directly to a motor shaft.
Thad, thanks for the tip. Here is a link to the rubber sanding drum at Woodworker's Supply… http://woodworker.com/3-sanding-drum-for-5-shaft-mssu-202-018.asp
Cool!
Very nice indeed.
hi! cool idea! Still I have a critical problem here… "…For a tapered lamination, first tape down a tapered lamination…" Could you please explain or show something to help my imagination because I've been trying to make a tapered lamination for one year… Of course, completely unsuccessfully… 🙂
Ken, just buy a tapered lamination with the taper you want to replicate….001", .002", .003" taper per inch, etc. Use double sided carpet tape to stick that down to your sled. If you are running the sled through the sander from right to left like the ones shown in this build along, then tape the thin end of the tapered lamination pattern to the left side of the sled. Then tape the sandpaper to the top of this tapered lamination. To make your lams, first grind them all parallel and slightly over in thickness…like .010" over. Put one on the sled and run it through the sander. Flip it over and grind the other side. Keep flipping it over and grinding alternate sides until it reaches the target thickness. When finished, it should be an exact opposite of the tapered lam pattern on the sled. I hope this helps. Thanks for the question. I think I will make a blog post showing how to grind parallels and tapers. Jim
Jim Thorne
Thank you very much for your kindness but… even if I'm not honoured to do this, I must accept I live in Romania. I simply don't have places where to buy archery stuff. Yea, I can, for example, buy fiberglass (clear only, not black for recurve) but I had to pay $133 to receive 1 Smooth-on set (1 pint A + 1 pint B) from USA. So… I'm thinking hardly to find a solution for tapering ONE single lamination.After this step, all you said in your topic becomes possible!
Ken, you can cut our your own tapered lamination sled using a table saw and a simple jig. Make two parallel boards that are about 1" thick x (desired width) x 36" long. Sandwich them together with a spacer between them only on one end. For a .001" tpi (taper per inch) blank, put a .036" thick spacer, for a .002" tpi taper, use a .072" spacer, and for a .003" tpi use a .108" spacer, etc. Run this sandwich through your table saw to cut a thin slice off one entire side and it will cut one of the boards into a perfect taper sled. One of my bowyer friends taught me this trick. It also works well for some wedges.
Any suggestions for doing tapers on a full length lamination? I am doing longbows and cutting the pieces full length but I would still like to taper the lams a bit.
Yup
The simple way to make full length laminations…I assume you are talking about 72" laminations versus 36" half length laminations…is to cut and grind them as 36" laminations then splice them together in the center. Grind a bevel splice at the butt ends then glue them together with wood glue.
Put your tapers on the belly side then you can make them halves still put the thick ends together at where you are making the center some put center in the middle of the grip and some put center where the web of your thumb is in the grip
I love your blog.. very nice colors & theme.
Did you make this website yourself or did you hire someone to do it for you?
Plz reply as I’m looking to design my own blog and would like to find out where u got this from. many thanks
I designed this blog myself using the theme creator “Artisteer” and WordPress. Jim
Jim, this build aloing was very helpful. I followed it and made a lamination grinder very similar to this one. Only thing I changed was add additonal layers the base, motor mount and ramp to increase thickness, and make use of a whole 4X8 sheet, I used 3/4ply instead of MDF. This was not wise as it tends to warp. I need to make new MDF sleds to correct this.
Last thing, You used a rubber sanding drum, I bought one of the drums with a slot where you wrap normal sandpaper around it. I had the same problem of the the lamination grinding thinner at the edges. I fixed it by sanding off the soft rubber outside down to the hard core and truing the drum with a sled covered in sandpaper. Then I cut a sanding belt to spiral wrap the drum. Works great.