One of the most comfortable quivers to carry in the field or woods is a…
Comparing longbow riser layouts
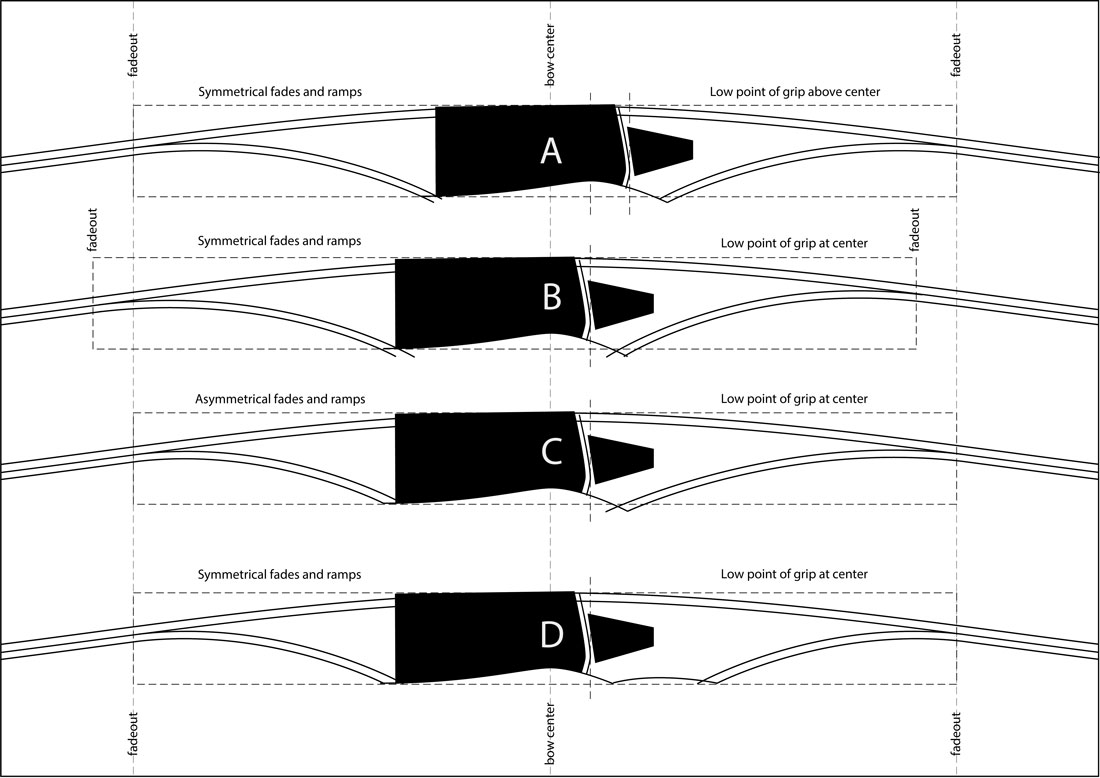
I’ve experimented with making longbows with four different riser layouts. Riser A represents probably the simplest layout. It puts the grip portion centered at bow center. For example, a 4” grip will be 2” above bow center and 2” below bow center, which puts the shelf at 2” above bow center. This seems like the ideal layout for a three-under shooter who pushes the bow at bow center and pulls the string at string center, with the string pulling hand pulling from directly behind the bow pushing hand. It creates a perfectly symmetrical bow, with perfect dynamic balance, and with equal length and equal strength limbs. The only downside is it doesn’t have static balance when holding the bow with only the thumb and forefinger. Since the deepest point of the grip is located above bow center, the lower limb is heavier and tilts down. Some bowyers say putting the grip slightly above bow center creates a “heavy chested bow”…a more balanced shooting bow that stays vertically aligned more easily while drawing and shooting.
Since I prefer having the bow balance while I am holding it and carrying it around, I prefer having my thumb and forefinger located at bow center. Because of this, I’ve always been tempted to move the handle down one inch lower than seen on the symmetrical layout, like on Bows B, C, and D. This allows the bow to balance more easily as I am holding it and carrying it around. Also, since I shoot split finger style, having the grip lower and pulling closer to string center also feels more balanced when drawing and shooting the bow (to me at least).
So, when moving the grip down, I guess the logical question to ask is “what do you need to do with the fadeouts and ramps?” Should they move down with the grip, or should you leave them in position and only move the grip? Riser B shows them moving down with the grip. This keeps them symmetrical relative to the deepest point of the grip but not relative to bow center or the limb tips. On the other hand, Riser C and D show them staying in position and only moving the grip down.
When I made Riser B, the bow seemed harder to tiller. With the lower limb actually physically shorter, the upper limb bent more easily close to the riser than the lower limb. It required some sanding to adjust the tiller so the full draw profile looked balanced and symmetrical. On the other hand, when I made Riser C, the tiller profile looked balanced and symmetrical without any sanding required.
The last comparison to consider is between Riser C and D (whether the limbs are effectively the same length or not) and how each layout affects bow balance. Is there a difference in the way Riser C and D tiller, balance, and shoot? I’m not entirely sure, but they seem to be about the same. The ramps near the fadeouts are very similar and the only difference is the sight window near the grip.
What got me interested in trying Riser D, is that all of the three-piece takedown recurves I build, and nearly all of them I’ve seen built by others, have the risers with this design strategy…you keep the limbs and fadeouts symmetrical, but cut in the grip where you like it. The thing about Riser D that makes it so tempting to make is it allows the same form to be use for all grip locations. You can make one single bow form press and one matching bow blank, and then you simply cut the grip and shelf where you like them.
My current approach is making Riser C or D. Both layouts have the deepest point of the grip at bow center, which provides static balance, and both layouts keep the fadeouts and limbs symmetrical, which makes the bows easier to tiller and balance.
I know I’m not the only bowyer who considers these questions about riser layout, because I’ve spoken to other bowyers who have asked me these questions or done similar experiments before finding the layout they prefer.
Related Posts

Glad to see another article Jim. I read every one of them, great writing
Jim – Do you have printable Hammer Longbow layout for Riser C?
Yes, please send me an email at jthorne@buildyourownbowNOSPAM.com (delete NOSPAM) and I will send you details about the plans and how to order. Thanks!
Do you still sell recurve bow blue prints
Email sent
I WANT TO BUY SOME BOW MAKING BLUE PRINTS
BUT NO LISTING ON THE WEBSITE
Email sent to arsenal_stx@hotmail.com
Just seen your site it’s great , would like to see some blue prints also ,
I’d love to see some blue prints myself ima first time builder but I’m excited to try..
Email sent