Here’s a build along for adding those sexy buffalo horn overlays to your limb tips. I think they look great and make a good bow look even better. There’s just something about polished horn on a trad bow that makes it look really professional.
Adding layers of horn, antler, or linen phenolic to your limb tips will make your bow limb tips more durable for use with high performance strings, stronger to avoid scratches and denting by rough use while hunting, plus…they just look fantastic. Horn tips are good for both an old bow needing tip repairs or for that new bow you are making. They look good and work great on all types of bows: self bows, wood laminate bows, and fiberglass bows. They are simple to install yourself and this build along will show you how.
First you have to get some overlay material. One way might be to catch your own wild water buffalo so you can collect his horns, saw them up, and grind them into usable pieces, or you can simply get them like I do and buy them from Ebay as “knife scale” blanks. Click here to read the related post Knife Scales for Longbow Tips. These Ebay “horns” come already sawed and ground into small planks. They usually cost about $8 to $15 depending on the size and color. Most of them are various shades of brown or black, but I also bought some that were a beautiful reddish color with streaks. I like the ones with streaks the best because they look really nice when finished. Most are about 1-1/2″ wide by 3 or 4″ long, and 1/8″ to 1/4″ thick. These are the perfect size for making tip overlays. I can usually get four limb tip overlays out of each scale. Since they are sold in pairs, that means you can get enough for four bows out of an $8 dollar pair. That seems like a good price to me. Probably the thing I like best about buying them this way is that they are already cut and ground so I don’t have to do it. Just the thought of holding raw, weirdly-shaped horn, antler or bone with my fingers while running them through the band saw really freaks me out. I don’t care to cut off any of my fingers just to get some all natural, primitive material!

Before cutting, rough up the gluing surface of the knife scale with 50 grit sand paper. I just rub it on the top of the belt sander (with the sander turned off and unplugged of course). Use a hack saw to cut the scale into four, bow tip size pieces, roughly 1/2″ wide x 1/4″ thick x 2″ to 2-1/2″ long. I put sandpaper under it and clamped it down really tight to keep it from sliding. Also sand a flat surface of the limb tip on the belt sander. I often do this by hand so it is easier to control then touch it up by hand with a sanding block.

Spread Smooth-On epoxy on both the horn overlay material and the prepared bow limb tip. Clamp the overlay onto the limb tip with a spring clamp. If the surfaces are both flat and join together without gaps, then light pressure from a spring clamp is all that is needed. Let it dry under a warm heat lamp for 24 hours.

After the glue is dry, I use a spindle sander to grind off the dried glue that squeezed out and smooth off the rough edges. By keeping the belly of the limb on top it is easy to keep from grinding off too much. You can also use a file or rasp for this process.

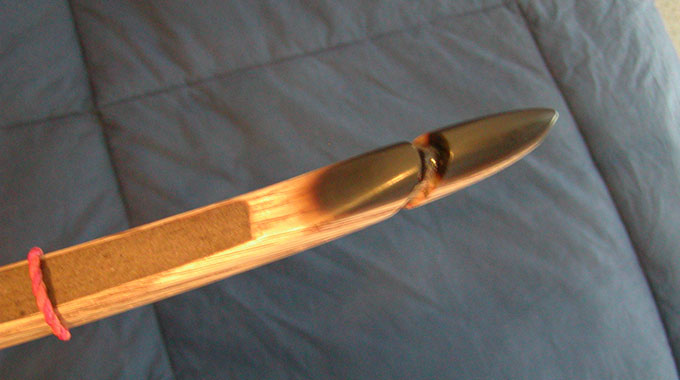
The rough shaping is finished…smoothed on the sides and rounded off a bit on the corners and ends.

Next, draw a line for the string nock across the back of the tip overlay, then draw it completely around the tip. Then draw another line completely around the tip about 5/8″ inboard from the string nock line. Then connect them with an angled line. This photo shows the lines going all of the way around the belly of the limb tip.

Use a chainsaw file to file the straight line across the back, then the angled grooves on the sides, and then round off the corners to make the groove into a tear drop shape around the tip.

Now finish shaping the tip with a spindle sander, belt sander, or files.

For final touches, sand it into shape with coarse sand paper and then finer grades of sandpaper. When using polished knife scales, make sure to rough up all of the polished surfaces before spraying or sealing the bow so the varnish will stick to the overlay. Smooth the tip and overlay with 220 grit sand paper and it is ready to spray with varnish.

The finished horn tip overlays are durable…and just plain sexy.