I’ve experimented with making longbows with four different riser layouts. Riser A represents probably the…
The truth about bow balance
I think that bow balance is one of the most interesting and important topics about making bows. What can be more important than building a balanced bow? I mean, this seems like possibly the most important thing we can get right. The crazy thing is that for something that seems so important to making a good bow, there doesn’t seem to be much useful information about it in books or magazines. The archery forums have plenty of discussions about tiller and balance, but many comments just seem to be “what so and so taught me to do” or opinions that are not based on experience or fact. I’ve read everything that I can find about bow balance and four popular myths seem to stand out…
Four popular myths about bow balance:
1. “Positive tiller is good for all bows and all shooting styles.”
2. “The grip must be located at bow center.”
3. “The limbs must be equal length and equal strength.”
4. “The best tiller is positive tiller for split finger shooters and zero tiller for three-under shooters.
So, are any of these myths true…and if so, which ones? Let’s do some simple tests to see if we can debunk these myths.
Here are the tests
Like most bowyers, I’ve done a considerable amount of experimenting while making bows in the attempt to discover the tiller settings that provide the best bow balance. I’ve tried all of these approaches on real bows with mixed results. I’ve made bows with different grip locations, different limb lengths, and different tillers. I’ve made them according to recipes and I’ve made them just by feeling the balance with my hands. Through all of this building and testing, I’ve developed some strong conclusions about bow balance, but I wanted to perform a series of simple tests that prove which recommendations are correct and which ones are just plain ol’ BS. So, I performed the following series of tests with a simple test “bow” that I made in my shop. I think you’ll find the results to be interesting and possibly surprising.

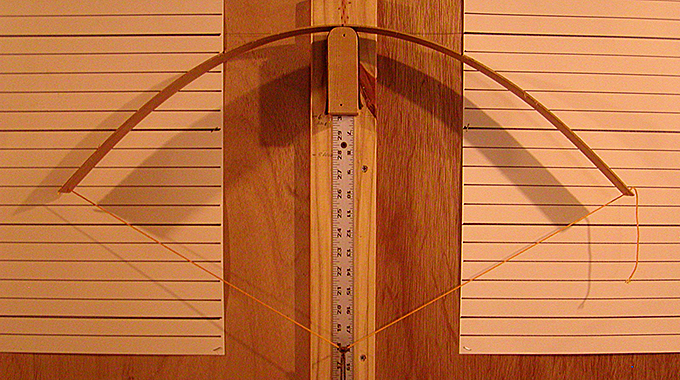
Figure 1. So here we go. I made a simple test “bow” out of a single parallel lamination. I found a clean piece of straight grained hickory and ground the lamination to uniform thickness its entire length in my drum sander. The lamination “bow” was 1-1/2″ wide by 36″ long and about 1/8″ thick. I cut a notch into each end to hold a string made with a piece of nylon construction twine. I tied a knot on each end of the string, and strung the “bow” with the twine inserted into the notches on each end of the bow. The string measured 33″ from tip-to-tip, which probably isn’t important, but gives you an idea how big the “bow” was. I don’t think these lengths are very important, though, since I just wanted to test for changes in bow balance.


Figure 2 and 3. I put a Sharpee mark on the side of the “bow” at the geographical center of the bow. Then I made marks 6″ to the left of bow center and another mark at 6″ to the right of bow center. These marks indicated the ends of a hypothethical “riser” and a place to measure limb tiller in two places. At brace height, the tiller measured 3″ between the string and the bow at both marks. The “limbs” were bending uniformly and looked very symmetrical. This showed me that the limbs were bending evenly and uniformly. I was very pleased with this.

Figure 4. I also made marks on the bow 1″ to the left of center and 1″ to the right of center (look closely at the top of the photo). I considered the right side of the bow to be the upper limb, so these marks indicated 1″ below bow center and 1″ above bow center.

Figure 5. Like the test “bow”, I also marked the string in the center, at 1″ left of string center, and at 1″ right of string center. This photo also shows the string loop that I tied to the string. For the pulling tests, I put the string loop on the pulling location of the string. This allows the string to be pulled from a consistent place without sliding around, unlike a plain hook on the pulling rope which tends to slide all over the place.

Figure 6. Now for the tests. I put the bow on my pivoting tillering tree. With bow center at the center of the pivoting tillering tree, the tips were bent down to the same line on the wall from the back of the bow.

Figure 7. My tillering tree is set up with a pulley at the bottom of the wall and a pull rope that allows me to pull the bow while standing back at a distance. It has a couple of different eye bolts to hold the pulley at different locations. I put the pulley in the eyebolt that is located straight in line with the center of the bow.

Figure 8. The first test involved pushing at bow center (since the bow was centered on the tree), as well as pulling at the center of the string. As you can see in the photo, the string pulled straight down in line with the center of the bow, the limbs look perfectly symmetrical, and the bow tips were pulling down to the same line on the wall. This was a good sign. This meant that the parallel lamination test bow limbs were pulling evenly. We can assume that they were very near to being equal strength. We can call this perfect balance and perfect tiller. This should represent pulling a bow with three-under shooting style since we are pulling the string directly in line with the pushing location on the bow. No tiller adjustment required. Zero tiller is perfectly balanced.

Figure 9. For the next test, I left the pushing location at bow center (with the center of the bow on the center of the pivoting tillering tree) and pulled the string at 1″ to the right of string center (1″ above string center). This test should represent split finger shooting style since we are pushing the bow at bow center but pulling the string about 1″ above string center…the pushing and pulling locations are about 1″ apart. As you can see in this photo, the bow is tilted down on the right, the limbs are bending unevenly, and the right limb tip is pulling lower. In other words, the bow is unbalanced. It should be very easy to see that a tillering adjustment is needed to make the bow pull evenly. I didn’t show it in these tests, but it is common knowledge that making the lower limb stronger will make the bow pulled in this way to balance.

Figure 10. Okay…now for the next test. In this photo I left the bow so it was being pushed at bow center, but I moved the pulling location on the string to 1″ to the left of string center (pulling below string center). This test does not represent any shooting style, because obviously, you can’t shoot a bow this way. It would mean shooting the arrow right through your bow hand, which is not an option for most of us…lol. But seriously, the reason for this test is because it is the symmetrical opposite of the previous test in Figure 9. Like we should expect, it is also unbalanced in exactly the opposite direction as Figure 9. as well. In this test, making the right (upper) limb stronger would help balance the bow.

Figure 11. Now this is where the testing got interesting! In this test, the bow is being pushed at 1″ below bow center and also being pulled at 1″ below string center. The string is being pulled straight in line with the pushing location, so this can be considered three-under shooting style. WOW…even thought the limbs are obviously unequal length, the bow is perfectly balanced. See how the tips are pulling down to the same line on the wall. This was a surprising test result. No tiller adjustment required. Zero tiller is perfectly balanced.

Figure 12. And now for a similar test…still pushing at 1″ below bow center, but now pulling at string center. This will represent split finger shooting style with a lower grip. Notice that the bow is out of balance! Like the other tests where the pushing and pulling locations were not aligned, this bow will require a tiller adjustment. Again, making the lower limb stronger will help balance this bow. Are you starting to see a trend? I am!

Figure 13. And now another completely illogical test, but useful none-the-less. This test shows pushing the bow at 1″ above bow center and pulling the string at string center. Again, it is not possible to shoot a bow this way, but it shows the out of balance result. Now it is obvious to see that the trend we are seeing is that any time the pushing and pulling locations are not aligned, a tiller adjustment is required to balance the bow.

Figure 14. And now for the final test…pushing the bow at 1″ above bow center and pulling the string also at 1″ above string center. Again, these pushing and pulling locations represent three under shooting style. And again, like the tests we did in Figure 8 and Figure 11, this bow is perfectly balanced. Isn’t this cool? No tiller adjustment required. Zero tiller is perfectly balanced.
Conclusions
So how well did these tests do to prove or disprove the four popular myths? Let’s compare the myths and the test results.
1. “Positive tiller is good for all bows and all shooting styles.”
FALSE! This can’t be true. The tests show that whenever the bow pushing location and the string pulling location are not aligned, the bow will pull out of balance and will require a tiller adjustment to come into balance.
2. “The grip must be located at bow center.”
FALSE! This is obviously untrue. Just look at Figure 11 and Figure 14. The grip was located away from bow center, yet the bow had perfect balance when the string was pulled directly in line with the pushing location. Very cool.
3. “The limbs must be equal length and equal strength.”
FALSE! This can’t be true either. Again, looking at Figure 11 and Figure 14, the limbs are unequal length, yet the bow was perfectly balanced. Plus, the bow in Figure 9 was pushed at bow center. This meant that the limbs in this test were equal length, and we already know from Figures 2, 3, 6, and 8, that our parallel lamination test limbs were equal in strength. This shows that it is really the bow pushing and string pulling locations that have the greatest affect on bow balance.
4. “The best tiller is positive tiller for split finger shooters and zero tiller for three-under shooters.
TRUE! Hooray…we finally proved one myth to be correct. Now that we know the truth about bow balance, we can tiller our bows with confidence, knowing that we are doing things for a purpose and not just because someone told us to “do it this way.”
As I have mentioned in other posts about bow balance, I do believe that moving the grip lower on the bow for split finger shooting style allows a bow to balance with a smaller tiller adjustment that when the bow is pushed at bow center and pulled above string center. In fact, it seems that when I place the grip just below bow center and pull at string center, most bows tend to dynamically balance with less tiller adjustment and they also tend to shoot much better! I have a theory that the best shooting bows, for all string pulling styles are the ones that are pulled exactly at string center…but I’m sure that requires some additional testing.
I honestly believe that most bows should be made so that the thumb and forefinger of the bow hand are located at bow center so the bow will have static balance (it doesn’t tilt while you are carrying it around), then it should be tillered to have dynamic balance for the pushing and pulling locations that the intended shooter will use on the bow. This means tillering the bow so that the limb tips will pull down to the same distance on the tillering tree while the bow is being pushed and the string is being pulled where the intended shooter will push and pull it. Also, the simple tests shown above suggest that the closer together we can locate the bow pushing and string pulling locations, the easier it is to make the bow balance. This means getting the shelf/arrow pass as close to the bow hand/grip as possible.
Click here to read the related post “Thoughts about bow balance and vibration.”
I hope you learned something from these tests. Feel free to make a comment below.
I hope you learned something from these tests. Feel free to make a comment below.
Related Posts
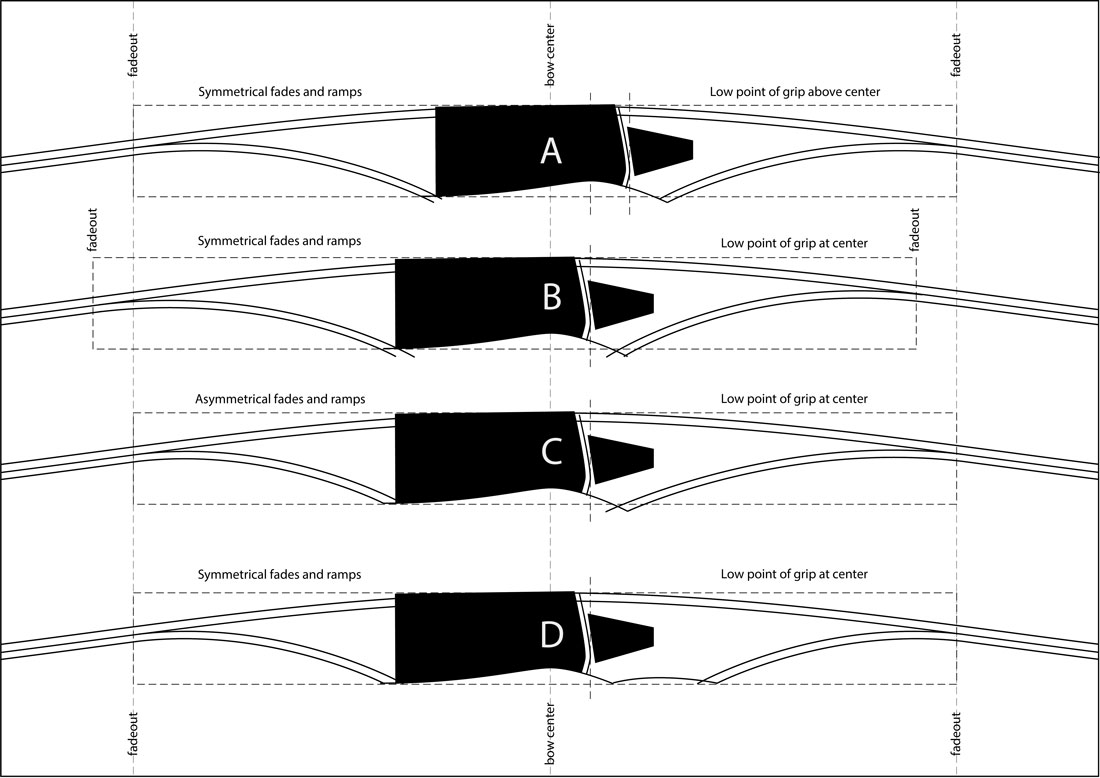

From the off, before I read the article, it is obvious that two of the myths are mutually exclusive. The grip cannot be at the centre of the bow AND have the limbs of equal length. This is particularly if we are talking about the "modern" style longbow rather than a warbow style, as the limbs have dips either side of the handgrip and f you want the arrow to nock at the centre, the limbs must necessarily be of uneven length (the lower shorter as som of it lenght is taken up with handgrip), It then follows that the limbs will have to be of differing stiffness to compensate.
You are exactly right…I can't agree with you more! The tests prove this.
Let me ask you this… if you have someone who heels the bow grip a fair bit so that the pivot point is now about 1.5" or so below bow center, what effect can that have on tiller. I do this myself and shoot 3 under. I ended up tillering 1/8" positive on the lower limb and raising my nocking point a bit to get it to shoot right. The bow seems very balanced like this with little to no hand shock, but the riser is very heavy 3 pc take down. Should this bow feel so balanced like this? Is the riser weight masking a lot of potential vibration and hand shock?
Hey David, it sounds like it is balanced if it feels balanced and does not vibrate. The lower you heel the grip the farther the pushing and pulling points probably are located. My tests show that the farther apart the pushing and pulling locations are, the more tiller adjustment is required. Have you tried pulling it on a pivoting tillering tree? A bowyer friend of mine was telling me about a Hill style bow that he heeled low in the grip…he got it to balance nicely with the lower limb 1/2" stiffer than the upper limb. The lower limb was also shorter. He was pulling split finger style. Sure…a heavy riser should help reduce vibration.
That sound about right then as I ended up a little positive, heeling the bow a bit and shooting 3 under… if compared to your friend and his longbow description. This particular bow has a flat, angled grip… no swooping curves. It is nearly dished and would describe it as a medium angle. I am playing with grips right now though and if I had it to do over, I'd have a bit of curve like the Bob Lee medium grip pushing the pivot point more upward toward the bow center. I dont feel confident shooting with a high wrist as I am a compound convert, and all compounds these days are low wrists…
As far as the tillering tree, yes that's how I got it balanced initially, but everyone's grip is different and even how they put pressure on the string is different… I myself have a deep hook on the pointer and middle fingers, and the string rests on the ring finger tip where as some would deeply hook all 3. I am nearly "2 under" if you get me. Not to mention I switched from split to 3 under a couple months ago. I am also working on a more relaxed bow hand which is helping my shooting and resulting in a bit less heel low on the grip and a better bow reaction… jumping more toward target.
What about pressure on the string? The hook on the string puts pressure on one very small point on the string. Fingers spread that pressure out on the string. How would this effect the strain on the limbs?
I think that the pressure applied to the string by the fingers does affect bow balance. I know some bowyers who make a pulling device to imitate the pulling style of the intended archer. Thanks for bringing this up.
Hi Jim, very illuminating, thanks! I'm just starting in bow making and while I'm waiting for parts trying to get my head around tillering. I've been reading articles and most people seem to agree that to offset an imbalance due to the position of the hand being away from center in split finger shooting ( active fulcrum being above the static (ie; bow center), is to strengthen the lower limb.
In this article you say " it is common knowledge that making the lower limb stronger will make the bow pulled in this way to balance.". Anyway I don't doubt this using any of my own reasoning (as our perceptions are often incorrect) but rather in reference to an another article by Dean Torges, who states; "The answer for most of us is to assign positive tiller to the upper limb in same-limb bows, in deference to the five quotations excerpted from internet bulletin boards. However, since the lower limb works almost four inches further from the dynamic fulcrum than the upper limb, we are weakening exactly the wrong limb when we build such bows." http://www.bowyersedge.com/organic.html.
So really I was wondering if you have any thoughts on Deans thinking or have done any testing that might have bearing on this?
Thanks again for posting this article as it's helped me quite a bit getting my head around it.
Hey Joel, Yes, these tests were greatly influenced by Torges’ articles. His writing style is very abstract and can be confusing, so that is one of the reasons that I did the tests using this parallel lamination test bow in order to eliminate as many variables as possible and isolate the variables of bow hand position and string pulling position. Where Torges speaks of assigning positive tiller to the upper limb in same-limb bows, I assume he is talking about split finger shooting style with the bow hand at bow center and the string hand pulling above string center. My tests confirmed that this calls for positive tiller.
I don’t understand why he says “since the lower limb works almost four inches further from the dynamic fulcrum than the upper limb, we are weakening exactly the wrong limb when we build such bows.” In order to assign a tiller adjustment for this model, he needs to define the position of the string pulling location. My tests showed that the relationship of the pushing and pulling locations affect bow balance the most. If his model is pulled split finger, then a tiller difference is required, but if his model is pulled three under then equal tiller should balance the bow.
I hope this helps. Jim
Great post!
I have a question though. And yes, I know it's more than a year old and might not ever be answered….
I don't mean for this to seem confrontational, but put simply: How did you come to the conclusion that positive tiller (weaker top limb, stronger bottom limb) is better through these tests? If anything, the way I'm seeing it (and I'm looking at the same pictures), it should be the opposite.
In Dean Torges' "Tillering the Organic Bow," he basically advocates an asymmetrical design with either even tiller or negative tiller. This is a point of high contention among bowyers — But I think your test shows him to be right.
Take Figure 9. I think this approximates how most people make and shoot their bows (except this one has "even" tiller, and most people do tend to make theirs positive). If you made the left/bottom limb stronger, it would travel even less and appear <em>less balanced</em>.
In Figures 11 and 12 you basically show what Torges' advocates: A longer top limb. Figure 11, showing three under with an even tiller shows that the bow is perfectly balanced. Figure 12 shows the same as Figure 9: The left/bottom limb doesn't travel as far. Making this limb stiffer would, again, make it travel even less and appear less balanced.
I can't translate this into years of real world experience, but anecdotally, I can relate to you the latest bow I'm working on. It's 72" tip-to-tip with the arrow pass (planned) at geographic center — so 36". This makes the top limb two inches longer than the bottom. I shoot split finger. Early on in the tillering, at first low-brace, it was obvious that the lower limb was stronger. I gave it a couple tugs by hand, my string hand where it should be for a split finger draw, and the bow seemed quite unbalanced in the hand. I got the limbs evened up and now it feels much better. I guess to get a completely accurate "test" out of this I'd have to weaken up the bottom limb now to get the effect of a negative tiller too — but I don't know if I will.